Modules and outputs are two important concepts for creating quality, reusable Terraform code. This post and accompanying video put those concepts into practice. This is a lengthy subject, so grab a drink of your choice and settle in for the ride. Also, if you are getting started with Terraform, be sure to check out my other articles and videos on using Terraform. The information below assumes some knowledge of Terraform.
Getting started with Terraform and Azure: Overview and Setup
Terraform Workflow with Azure: Write, Plan and Apply
Input Variables with Terraform and Azure
What is a Module
A module is a piece of reusable code that contains a collection of resources to create infrastructure. Every programing language has some version of a module. In PowerShell they’re called functions. When the code is called, we pass in the inputs, and if all goes as planned, we get the results as outputs.
Reusability is vital for a module. If you create a block of code that deploys something useful, it’s great to reuse or share that code.
What a Module is Not
Let’s talk about what a module is not. A module is not a single instance of a resource. It may be tempting to turn everything into a module. Create a module for a VNet, Storage Account or App Service for example. Each of those are single resource and not the makings for a module.
A module is a collection of resources. To paraphrase the Terraform documentation; a module is not a thin wrapper around a single resource. If that’s what you are deploying, use a resource block—no sense in complicating things with a module.
The name is a good indication if something should be a module. If the module name is simply “Azure SQL,” that may not be a good use case for a module. But if the module name is “Azure App Service SQL with Backend,” that may be a better candidate for a module because it’s a composite of resources.
What Makes Up a Module
A Terraform module is contained in a directory. For example, the root module we created in the previous videos was a module. All projects start with the root module and the root module can call child modules. The child module is a container for other resources.
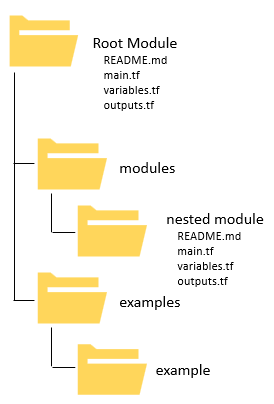
Child modules are optional, and a child module can have child modules. However, it is best to keep the module structure as flat as possible to keep things readable.
A module has input variables. These are variables sent from the calling or root module. The inputs are used to create resources. The resources are what is deployed when the module is called.
If all goes well, the module can return one or more outputs. These are results from creating resources. The outputs can be informational or used as input to subsequent modules.
Outputs need to be specified. Child modules run in their own environment. The output from the module is not passed back to the parent module by default. If we need data from the child module to finish a subsequent step, that’s a problem. An output block specifies the information passed back to the parent module.
Module Components
Different environments may have slightly different variations on how modules are constructed. The following is a review of the standard module structure from the Terraform documentation.
Root Module
The root module is the main entry point for the module. A root module is the only requirement for a module. There must be e a directory with some Terraform code to create a functional module.
README
The module should have a readme file, either called README or README.md. The README.md file is a markdown file.
A module can have child modules if that helps with organization code. A module with a readme file is intended to be reused. A module without a readme file is a dependency on the parent module.
License
A license should be included, especially if publishing publicly.
Terraform Files
There will be a set of .tf files in the module. Two of them are main.tf, and variables.tf. We went over these in a previous post and video located here.
There is also an outputs.tf file that defines the outputs. Descriptions should be included with variables and outputs. This will help the next person that has to reuse this code, and that next person may be you!
Examples
Finally, supply examples in a separate examples directory.
Once done, the directory and file structure of a simple module will look like this:

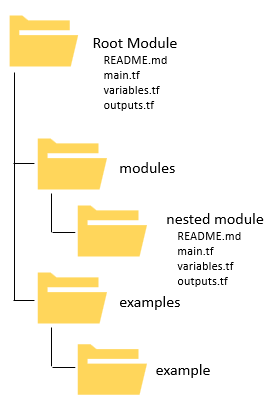
Or, the module structure could be as complex as this, with each child module and example having their own set of files.
Lab
The lab below creates a couple of simple modules that go against some of the rules outlined above. Rules are meant to be broken, right? The example uses two, single resource modules. This demo aims to show how to pass inputs and outputs between modules. Demonstrating this is easier with a less complex example.
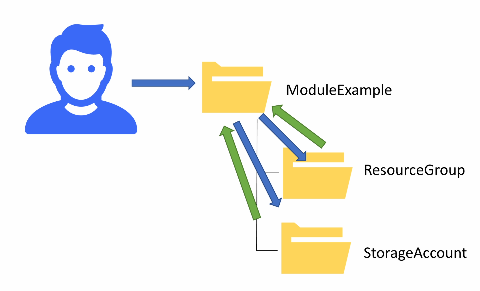
The example creates a root module and two child modules. The first child module will create a resource group and output the resource group name. The resource group name is passed to the second module to create a storage account. The second module will pass back a randomly generated storage account name.
There are a couple of other items covered along the way. First, an expression is used to concatenate values to create a resource group name. Also, a random resource is used to create a random string. After that, the random string is used to create a unique storage account name.
Creating Modules Lab
The following lab is about parent, child modules and how to pass information between them. In real life, it may not make sense to create modules for a single resource. I tried a larger deployment but thought simpler code makes for a better example.
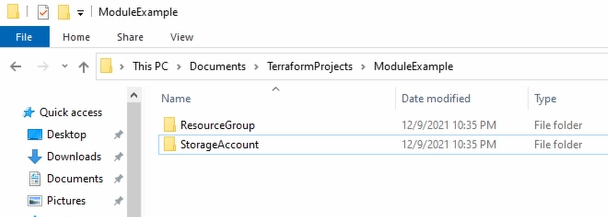
Start by going to VSCode or the editor of your choice and creating the directory structure. The root folder is ModuleExample, and the child folders are ResourceGroup and StorageAccount. Create a similar folder if you plan to follow along.
By the way, the code used for this example is available on GitHub.
https://github.com/tsrob50/TerraformExamples
Open the ModuleExample folder from VSCode. Create a main.tf file in the root module, right under the ModuleExample directory.
Next, add our provider. The provider is found by going to the terraform registry at registry.terraform.io. Select Azure, then Use Provider at the top right corner.

Update configuration options with features and the open, closing squiggly brackets. Once finished, the main.tf will look like this.
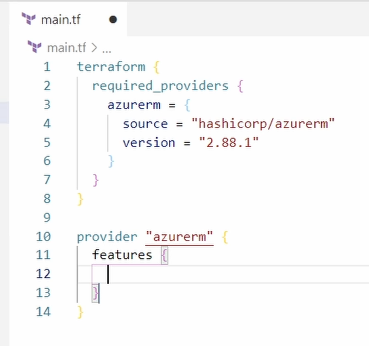
Save and close once finished, we’ll come back to that shortly.
Resource Group Module
In this section, we create the Resource Group module. Start by going into our ResourceGroup folder and create a main.tf and a variable.tf file.
Open the main.tf and add a Resource Group resource block. Examples of resource blocks can be found in in the Terraform Registry.
A resource group requires two settings, a name and a location. It is possible to pass in the name as a variable, but let’s do this a little differently. Coming up, we create a storage account in addition to the resource group. This example uses the same “base name” for both to create two resources based on the same variable.
Open the variables.tf file under the ResourceGroup module.
Create two variables, one for the base name and one for the location. Don’t forget to add a description to your outputs. Once finished, the variables.tf file will look like the image below.
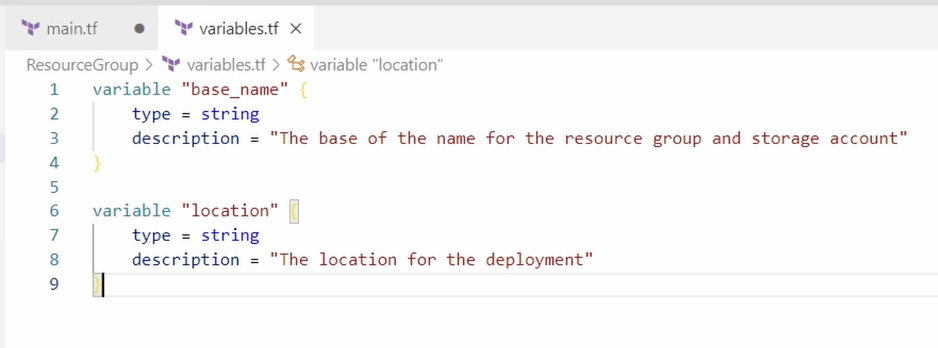
Save the file once updated and go back to main.tf in the ResourceGroup module.
Update the location from the manually entered setting to the variable var.location.
Next, we have the base name, var.base_name. We will append an “RG” at the end of the variable to create a resource group name. The following steps will concatenate a variable with a sting for the resource group name.
Remove the existing string used for the name value and add double-quotes.
name = “”
Next, we add the value of the variable by starting with a dollar sign and a pair of squiggly brackets
name = “${}”
Add the variable for the base name between the squiggly brackets.
name = “${var.base_name}”
Immediately after the closing squiggly brackets, add the text “RG”.
name = “${var.base_name}RG”
once finished, the main.tf file for the ResourceGroup module will look like the image below.

The name is now the value of var.base_name followed by the string “RG”.
Save and close the files and we’ll move on to creating a module block.
Create a Module Block
Next, open the main.tf under ModuleExample. There are multiple main.tf files in different directories for these examples, be sure you are working on the correct one.
Next, create a module block. A module block starts with the word module. The finished block will look like the image below.
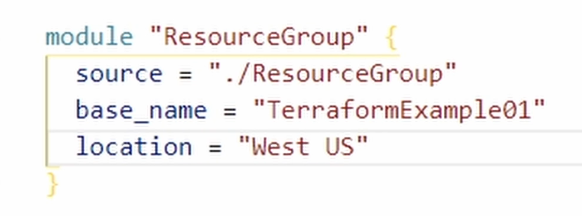
After module is the local name, ResourceGroup for this example.
The source argument provides the location of the module. The above example uses a relative path to the ResourceGroup directory. Notice it’s in quotes and uses the Linux style directory structure.
The base_name and location argument provides the input variables we created for the Resource Group module.
Save the file and open the terminal to test. Be sure the terminal is in the ModuleExample directory and run a terraform init.
Next run terraform plan.

The output shows a new resource group will be created with the name TerraformExample01RG, indicating the expression worked. We don’t need to apply at this point. Next, create the Storage Account Module.
Storage Account Module
Close the main.tf from the ModuleExample directory and go to the storage account module.
Next, create the main.tf and variable.tf file for the storage account module. In the main.tf file, add the minimum required for the Storage Account resource.
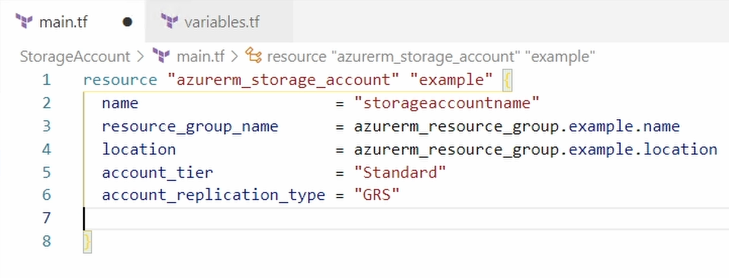
We need to supply three items: the base_name used as part of the Storage Account name, the location, and the resource group name.
Open the variables .tf file and add the base_name, resource_group_name, and location variables, as shown below.
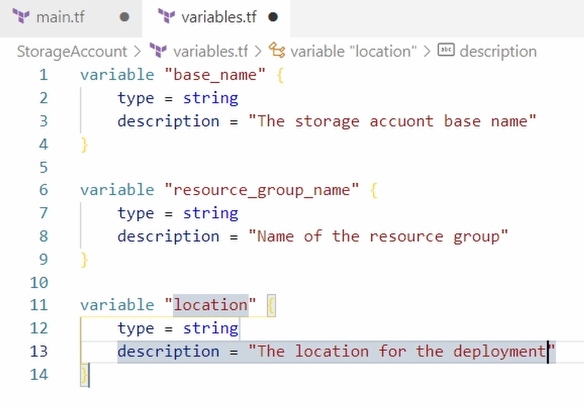
Save once finished and go back to the StroageAccount module main.tf file.
Random Provider
A storage account name must be globally unique and limited to numbers and lower-case letters. Random characters were added to the end of the storage account name in the previous videos and posts to make it unique. This example requires random characters without manually adding the characters at each deployment.
A resource provider called Random is used to solve this problem. The Random Provider is used to generate a random string that we’ll append to the end of base_name for a unique storage account name.
To use the Random Provider, go back to registry.terraform.io ad search for Random at the top of the page.
Go to Registry.terraform.io and search for “random”. Random is a HashiCorp provider.
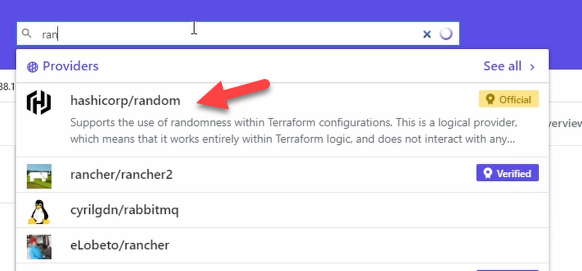
Select “Use Provider” and copy and paste the provider into the main.tf for the storage account module.
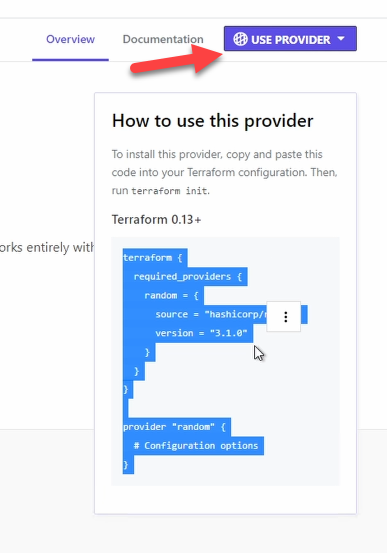
Remove the provider block, it’s empty and not needed. Once finished, it will look like the image below.
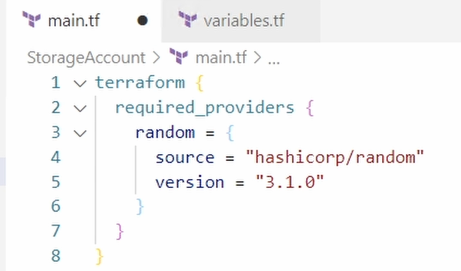
Next, add the resource random_string with the local name random.
There are three arguments to add:
- Length specifics how long the string will be. Set this to six.
- Special indicates if random characters are included. Set this to false to exclude special characters from the string.
- Upper indicates if upper case characters are included. Set to false to exclude upper case characters.
Once finished, the random block will look like the image below.
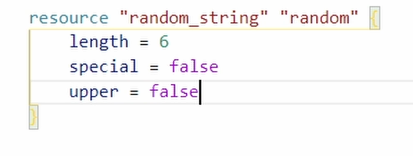
Find a complete list of settings for the random string provider here: https://registry.terraform.io/providers/hashicorp/random/latest/docs/resources/string
That creates the random string used for the storage account name. Next, the random string is used to create the storage account name.
Go to the azurerm_storage_account resource block to update the name.
Everything is in quotes, just like the ResourceGroup name. Add the dollar sign, brackets and var.base_name
name = “${var.base_name}”
Immediate after the closing squiggly bracket, add the code to concatenate the random string
name = "${var.base_name}${random_string.random.result}"
We are almost there, just one more change. We did not include any input validation for the base_name variable, and there are capital letters in our current example. Capital letters are invalid for a storage account name. We can use an expression to convert var.base_name to lower case. Add the word ”lower” immediately before var.base_name and put the variable in parentheses.
name = "${lower(var.base_name)}${random_string.random.result}"
The name of the storage account is now the value of var.base_name in lowercase followed by the random string.
Next, update the resource_group_name and location arguments with the variable settings. The full block of code for the storage account will look like the image below.

Save and close all files and go back to main.tf in the ModuleExample root module.
Open the main.tf file and create a module block called StorageAccount. Provide the source and base_name as shown below. The settings are similar to the ResourceGroup module.
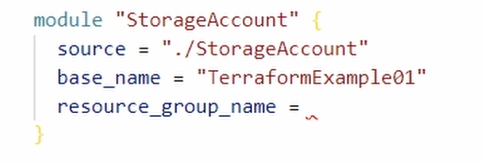
There is a problem with the resource group name. The name was dynamically created based off the base_name and the letters “RG”. We could simply add that to the StorageAccount block, but that would require manually updating any time it changes.
The better option is to use an output statement in the ResourceGroup module to pass the Resource Group name back to the parent module.
Output
Next, we create an output block in the ResocueGroup module that returns the resource group name.
Create a file called outputs.tf and add a new output block with the local name “rg_name_out” and the value “azurerm_resource_group.example.name” as shown below.
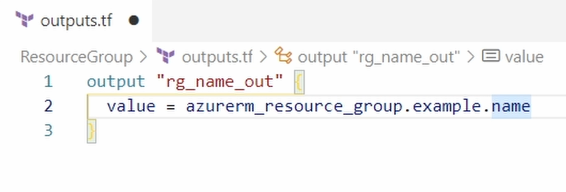
Review that the “azurerm_resource_group.example.name” in the ResourceGroup main.tf file. This is the value of the Resource Group name.

Save and close the files in the ResourceGroup module and go back to main.tf in the root module.
As configured, when we apply the deployment, the resource group module will run first. Once finished, it will return the resource group name in the output. We’ll use that to supply the resource group name to the storage account module variable.
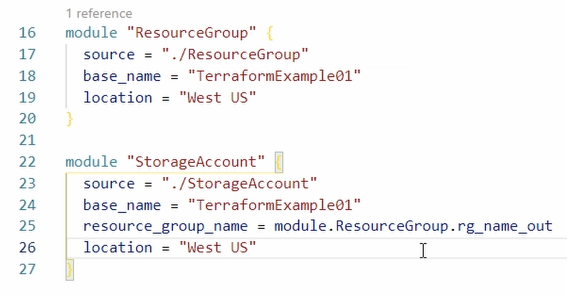
Update the resource_group_name argument with the string “module.ResourceGroup.rg_name_out”. With this configuration, the output of the Resource Group name from the ResourceGroup module is input for the StorageAccount module.
Add the location to the StorageAccount module and save the file. Once finished, the ResourceGroup and StorageAccount modules will look similar to the image below.
Apply the Configuration
Run a terraform init and terraform plan next.
Scroll up to the ResourceGroup action in the output from terraform plan. The name is correct.

Go to the storage account section and notice the name indicates “Known after apply”. The name is dependent on random characters generated when the configuration is applied.
Run terraform apply to apply the changes.
Once finished, we can see the name of the storage account in the CLI. Notice the name has random characters at the end.

Storage Account Output
The code is now working, but you may want to use automation to deploy modules. For that, it would be helpful to have the new storage account name as output from the StorageAccount module.
Close all open files and go back to the StorageAccount module. Create a new file called output.tf. Add an output block for the storage account name as shown below. Save the file once finished.

One more thing, outputs are passed back to whatever called the module. We called the root module when we ran terraform apply in the previous example, the root module called the resource group and storage account module. The outputs are exposed to the root module the way it sits now, but not to us.
Next, run terraform output to see what outputs we have.

We can fix this by adding outputs to the root module. Save and close all open files and go to the ModuelExample folder.
Add a new outputs.tf file. This file echoes the outputs from the two child modules. Update the file with the values from the module outputs as shown below.
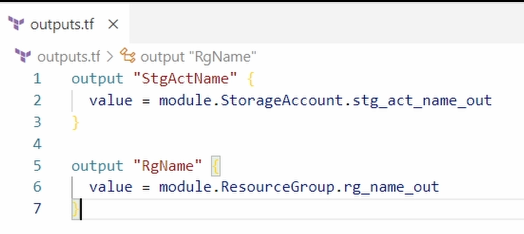
Notice the values in the examples above reference the module, then the module name, and then the output name.
Save the file once finished and let’s the updates.
Destroy and Apply
Run a terraform destroy to remove the existing deployment. Unless, of course, you put this into production.
Once the destroy is finished, run terraform init and terraform plan.
Notice at the bottom of the output from terraform plan shows two new outputs, RgName and StgActName. That is the new output form the ModuleExample module.
Run terraform apply next.
Once finished, we can see the new output at the bottom of the screen. Also, run terraform output to see the new output values from the ModuleExample module.

The modules are successfully passing data with outputs!
Summary
Congratulations on making it to the end of this post! We created examples of calling modules and passing data back from modules in this post and video. We also added the random resource and lower function with the example. Of course, a module with a single resource may not be best practice; but it did make for a good example.
Upcoming content will build on this example with more complex deployments. Don’t forget to run terraform destroy to clean up the examples.


2 thoughts on “Modules and Outputs with Terraform and Azure”
Can you create azure child module vidoes with loop
example:- create 2 subnets, 2 nsg, and associate each of them
This may help https://youtu.be/RsDgtUZAugA