
This week I started working with Logic Apps. I have a project with a specific end goal in mind for my first Logic App application. This post will cover the first part of the process, moving data from a webhook to Azure Service Bus with Logic Apps.
When I started this process I thought it would be fairly simple and assumed documentation would be plentiful. I was wrong. It is not complicated for anyone who has some basic understanding of each concept. Documentation, however, is limited, outdated or just not complete. It took me a lot longer than I expected to get a functional example. This post outlines the steps I took to get to a working example. Before getting into that, let’s cover each component for reference.
- Webhook – HTTP call that starts a process. The body of the HTTP call contains the data.
- Logic App – An Azure workflow or orchestration tool that moves data along a path or starts processes with the use of connectors.
- Service Bus – An Azure based messaging service that reliably passes messages between applications and services.
- Service Bus Topic – Service Bus that leverages a publisher, subscriber method for passing messages. Messages are sent to a Service Bus Topic and rules are applied to the messages that filter them to specified subscriptions.
Process Overview
Now that’s out of the way, let’s cover what I’m trying to do in more detail. My goal is to pass data from a webhook to a Service Bus Topic. Logic Apps brokers the connection, accepting the data from a webhook and passing it to the Service Bus. Here is an overview of the process:

This post stops at getting data into the Service Bus. What I do after that is the topic for a future post. To be honest, I’m writing this as a reference to myself as much as for anyone else.
Logic App Configuration
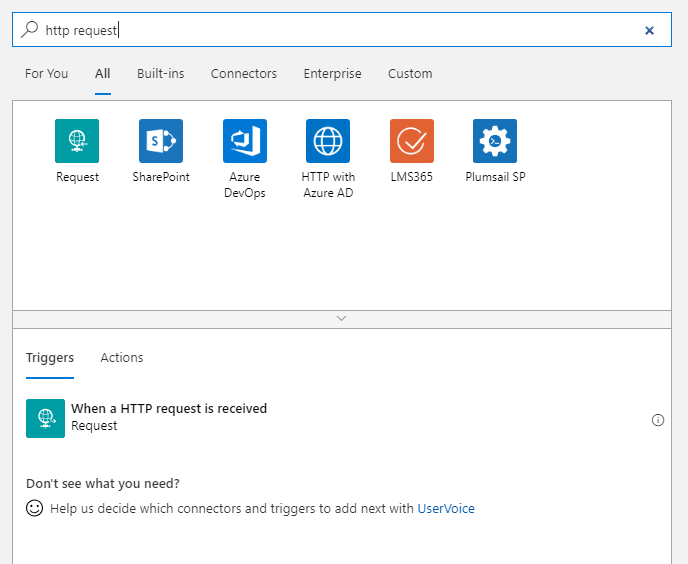
I start with the Logic App. Create one and give it a name. Once deployed, open and create a blank Logic App. Search for HTTP request and select the trigger When an HTTP request is received. This creates a trigger that responds to Webhooks. Notices that the URL is avaialble on save.
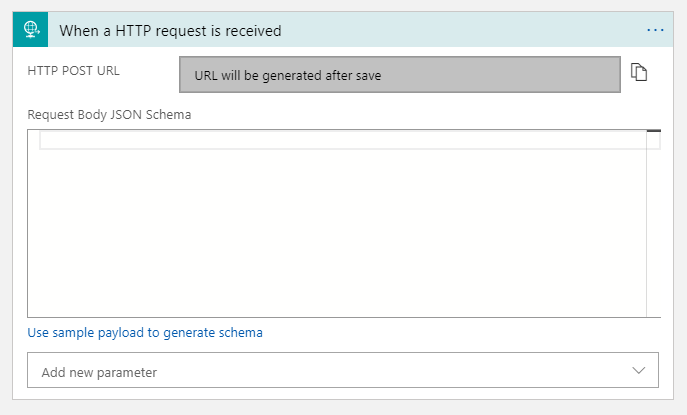
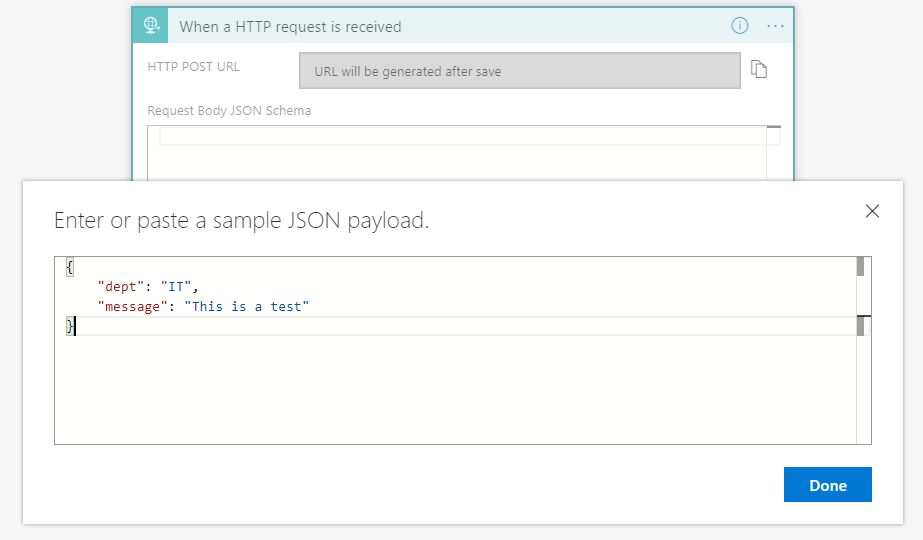
Next, I’m going to set up the JSON schema for the data I’m sending. Two pieces of information are passed into the Logic App for this example, a department name and a message. A sample payload will look like the JSON below:
{
    "dept": "IT",
    "message": "This is a test"
}
Click on Use sample payload to generate a schema and add the sample payload above or create your own.
Next, select Add new parameter and select the Method option. Change the Method option to Post. Once finished, it should look like this:
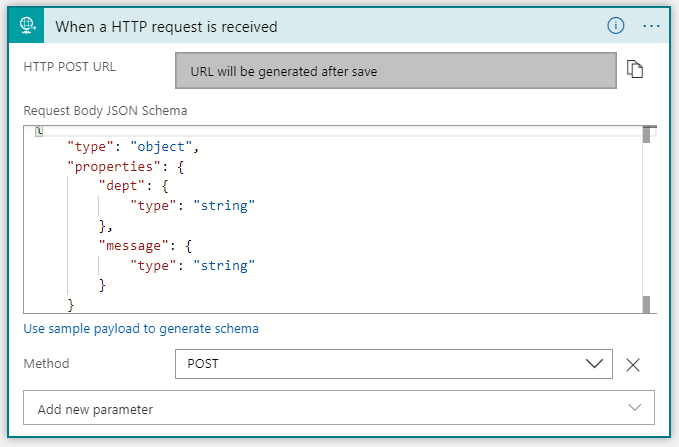
This should be enough to get the department and message into Logic Apps. By default, the HTTP endpoint will respond to a Post Webhook with a 202 accepted status message. I am going to add a 200 response to the HTTP Post that returns the data passed in the request. This is as simple as adding a new HTTP Response step. Click on the Plus ‘+’ sign under the HTTP request step and search for Response. Select the Response Request action.
Leave the status code at 200 and click in the Body section. A list of dynamic content will appear. Select Body from the list. Once finished it should look like below.
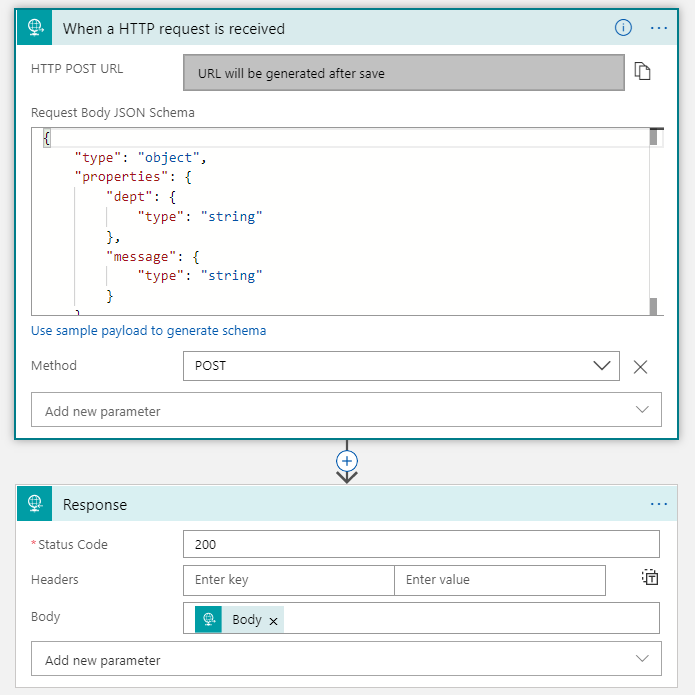
Now, the data passed to the Logic App is returned in the response. This is handy for troubleshooting.
Test Webhook
This step will test the webhook. Save the Logic App if you have not done so already. Once saved, there will be a URL in the HTTP POST URL field. Copy this and save it for later.
I used Postman to test the Logic App. An online tool like apitester.com or even invoke-webrequest in PowerShell could also be used. Postman is a free tool and good for testing webhooks and other online services. Create a new test and set the method to Post. Enter the URL in the URL section and go to the body section. Select raw and set the type to JSON. Past the sample payload from above. Once finished, it will look like below.

Once that’s entered, click on Send to start a test. Postman will display a 200 message and output the sample data as shown below if everything is correct. This indicates Logic Apps accepted the data and returned the body with a 200 message.

Service Bus
Now that data is getting into Logic Apps, the next step is to send that data to Service Bus. If you have not set up a service bus, do so now. Topics are only available with the Standard version of Service Bus or higher. The free tier does not support Topics. This example uses Topics and requires Standard tier of Service Bus.
Once the Service Bus is provisioned, go to Topics and add a new topic. Give it a name and leave the rest as default.
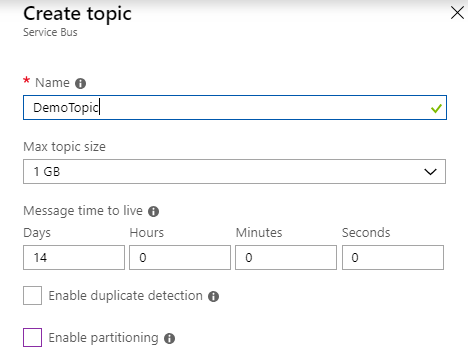
Next, go into the topic and select Subscriptions. Click on the plus ‘+’ sign to create a subscription. Give the subscription a name, the rest can stay as default.
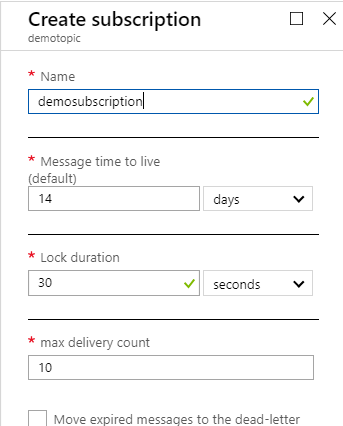
There are many other topics related to subscriptions and queues that won’t be addressed in this post. The focus of this article is getting data into the Service Bus.
Logic App To Service Bus Connection
Go back to the Logic App after the topic and subscription are configured. Add a new step under response and search for Service Bus. Select the Send Message option under Actions. This action will send the body JSON data to the service bus.
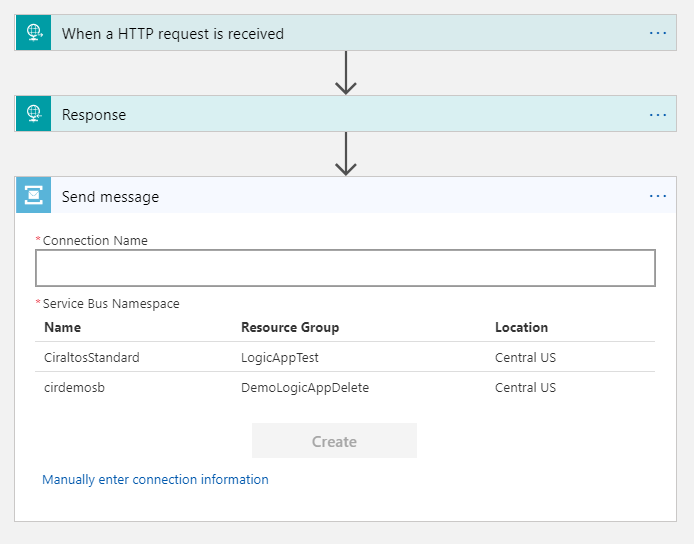
Give the connection a name and select the Service Bus Namespace from the list. The Service Bus setup in the previous step will show on the list. Use the default Shared Access Key and click Create. This will create a connection to the Service Bus.
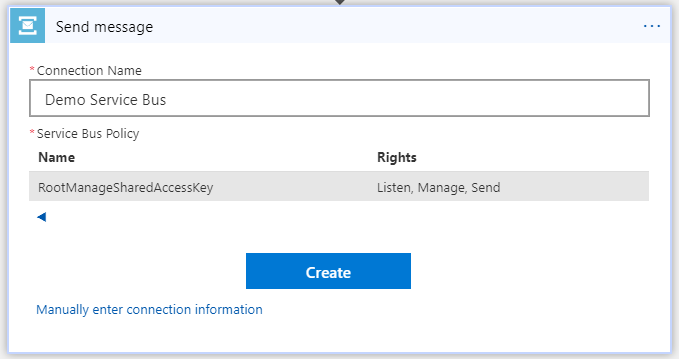
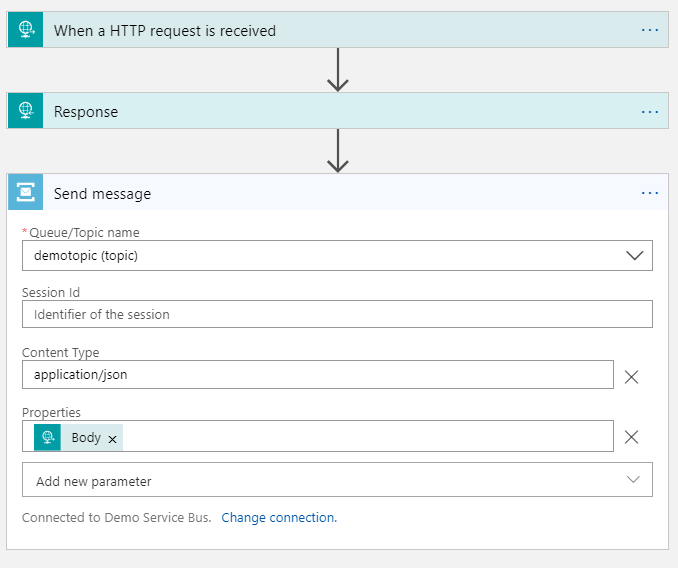
Once created, select the Queue/Topic name from the list, it will be pre-populated with information from your Service Bus. Remove System Properties from the window by clicking the ‘X’ next to it. Click the drop-down arrow next to Add new parameter and select Content Type and Properties. Under Content Type, type “application/json”. Next, go to Properties. A list of dynamic content will appear. Select Body from the list. Once finished it will look like below. Save before continuing.
Now for a test. Go back to Postman or whatever tool you’re using to send webhooks. Run the same test again. You should get the same 200 response.
Verify Test Data
The 200 response was received, but how do we know if the data was passed successfully to the Service Bus? The following section covers a few different steps that will verify the process worked as expected.
Logic App Status
In the Overview section of the Logic App, view the status for the Logic App. It should show Succeeded if it ran without error.

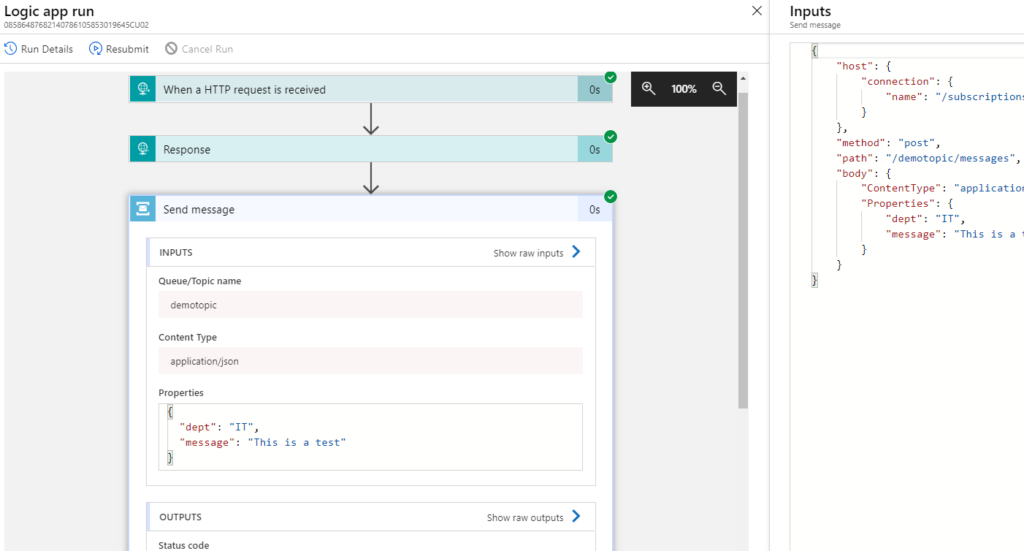
Next, click on the job that was most recently ran. From here we can see each step of the process, getting an indication of where a problem occurred if there was one. Also, notice that you can select each step to view raw input or output. The Run History is very useful for troubleshooting issues with Logic Apps.
Service Bus Status
Now that we have confirmed that the Logic App ran successfully, let’s move onto the Service Bus. Go to your Service Bus, Topics and go to the Subscription. Under Message Count for the Subscription, it should show 1 message. This is the message from the job that just ran and indicates the message got to the topic correctly.

Service Bus Explorer
At this point, we see there is a message in the Topic but we can’t actually see the message. For that, and to perform other advanced activities on the Service Bus, we need to run the Service Bus Explorer. Service Bus Explorer can be downloaded here.
Install and run Service Bus Explorer. To connect, first get the connection string from the Azure portal. Go to your Service Bus and select Share Access Policies. From there, select RootManageSharedAccessKey. A window will appear that lists Keys and Connection Strings. Copy one of the Connection Strings. Please note, in production, you may want to create a new access policy with permissions limited to just what is needed.

In Service Bus Explorer, go to File, Connect to create a new connection. Change the Service Bus Namespace dropdown to Enter connection string. Paste the connection string into the Connection String window and click OK.

Service Bus Explorer will now show the topics and subscriptions in the Service Bus. Click on the topic you set up and go into the subscription. Click on the Messages button. Leave settings in the Retrieve messages from subscription box as default and click OK.

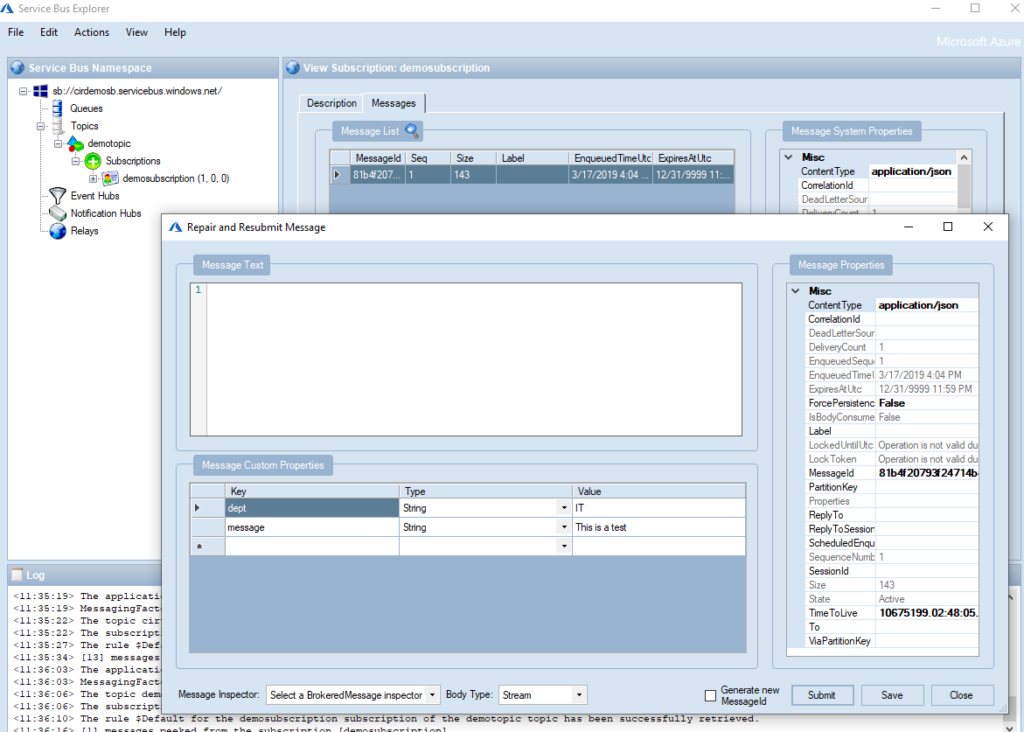
Double click on the message in the Message List to view details of the message. Here you can see the key’s and values passed to the Topic. This is confirmation that the data sent by a webhook was passed successfully to the Service Bus. Notice that there are many other features available with the Service Bus Explorer. I’ll come back to it in future posts.
Summary
This is where the post ends. At this point, you should have a working Logic App that updates a Service Bus Topic from data passed by a webhook. These steps could be modified fairly easily to update a Service Bus Queue on the Free Service Bus Tier. Stay tuned for my follow up post where I take action on the data passed into the Service Bus.


4 thoughts on “Logic App and Service Bus”
Thanks for your post. Hope can see your next tutorial soon.
Really cool, thank you for this
I am trying to fetch an array of objects and then sending each JSON object as a message to service bus from inside the for each control we have in logic App. But it turns out the the message can be posted to MQ but can be read by consumer. Reason being if i add the JSON Object in Properties parameter like you have shown it says PAYLOAD IS EMPTY at the consumer end. AND if i add the JSON Object in the content parameter then it says cannot convert string to say XYZ object.
Note . i have also set the content type to application/json
Hey @Sonal, I’m having a similar issue I think. I’ve set up my flow just as the tutorial has suggested, but I receive a 404 error, with the message: “Message received could not be parsed and is null.”. Some digging online says that the service bus must receive messages as base64 encoded, which changing the Content-Type header to text/plain should fix. I get no error, but then I also receive no body in the message.