
Variables allow us to easily modify terraform configurations with minimal changes to the code. Variables are an essential part of making reusable code across multiple deployments or environments. In this post and accompanying video, we will review using variables in Terraform.
A previous video on creating a Terraform and Azure development environment can be found here.
Understanding and creating a Terraform workflow can be found here.
Variable Block
A variable block starts with, you guessed it, the word variable. After that is the local name for the variable in double-quotes. The local name is referenced in the resources that use the variable.
variable "azure_location" {
  type    = string
  default = “West US”
}
Arguments for the variable are wrapped in squiggly brackets. The arguments available for a variable block are:
Type
The data type for the variable input. This can be set to a string, a number, or a bool. Setting the data type is optional but recommended for input validation.
Default
The default argument applies unless another value is specified during deployment. Setting a default value makes the variable optional.
Description
A description is used to document the input variable. The description is optional but recommended because documenting is a good thing to do.
Validation
A validation block creates input rules for the variable. Use with Type and Description block to add validation rules to the variable.
Sensitive
The sensitive block limits the output of the variable, so it’s not viewable in the CLI. This is useful if passwords or secrets are used with variables.
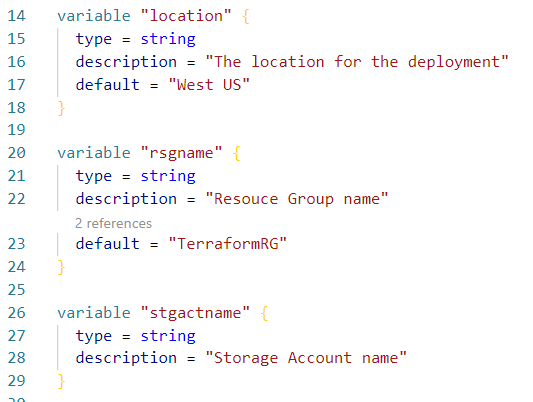
The example below shows variable blocks for the location, resource group name, and storage account name in a main.tf file in a project. Default values are supplied for the location and the resource group name but not for the storage account. Storage account names are globally unique; specifying a default would provide no value. A storage account name is provided when we deploy the resources.
Use Variables
Now that we have the variable blocks, we need to use them in the code. The example below shows a resource block that creates a Resource Group. The example uses a string for the name and location.
resource "azurerm_resource_group" "resourcegroup" {
  name     = “TerraformRG”
  location = “West US”
}
We create a variable called azure_location in the previous example. To use the variable instead of the literal string, replace “West US” with var.azure_location. The updated block of code looks like this:
resource "azurerm_resource_group" "resourcegroup" {
  name     = “TerraformRG”
  location = var.azure_location
}
Now, if we modify the varialbel block to change the location, Central US, for the example below, all instances of var.azure_location will use the updated location.
variable "azure_location" {
  type    = string
  default = “Central US”
}
The above settings may seem like a lot of extra work. For the example above, it would have been easier to change the location in the resource. However, if we are dealing with a large deployment with multiple resources, changing each instance of a location would be cumbersome end error-prone. We specify the new value with variables, and any reference to that variable uses the new setting.
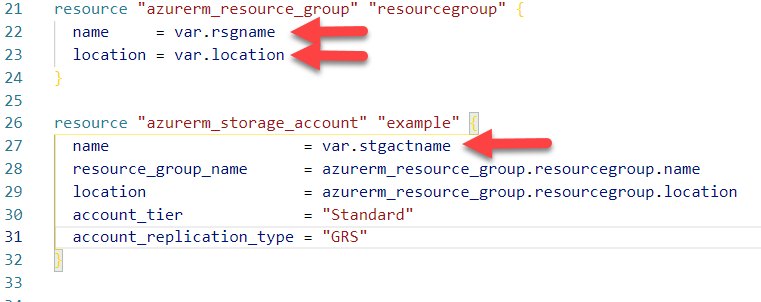
The example below shows the resource account name and location, and the storage account name updated to use a variable instead of a string value.
Variable Files
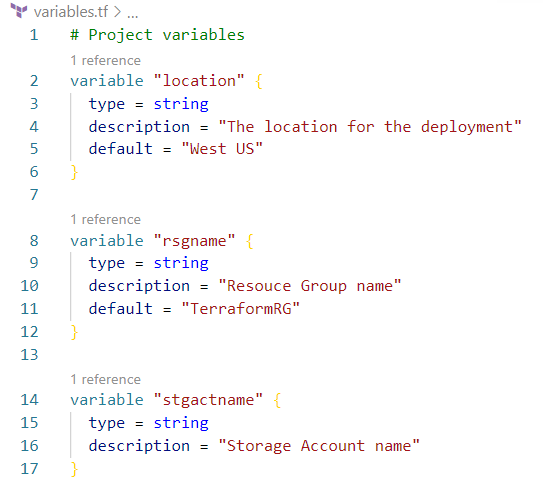
We can leave the variable blocks in the main.tf file, but it would be helpful to move the variables into a differnt file. Terraform treats all .tf files in a directory as one file. Shifting the variable into a different file makes the code more readable for us humans.
Create a new file in the project called variables.tf, or var.tf. then, cut the variable blocks form the main.tf file and paste them into the new variables.tf file. Be sure to save both files.
Add comments to Terraform by adding the hash (#) symbol. The comment starts at the hash symbol and ends at the end of the line.
Once finished, you will have a variable.tf file that looks similar to below.
Change Variables at the Command Line
We have our variable blocks in the new varialbes.tf file and the resource blocks reference the variables. It would fail if we tried to run a terraform plan because no name has been provided for the storage account. There are a couple of options for setting variables; one is at the command line with a -var option. The command below runs a terraform plan passing in the name for the storage account.
Terraform plan -var="stgactname=cirtest332244423"
Running the terraform plan command with the variable will add the storage account name as shown below:

Variable Definitions File
Using the command line to set variables would work, but that becomes cumbersome with large deployments. We could modify the default values for the variables with each deployment, but that’s not how a variable is supposed to work. Defaults values should only use when it is likely that the default value will be unchanged across multiple deployments.
A better alternative to passing variables at the command line is a variable definition file. A variable definition sets variables, overriding default values set in the variables.tf file. The name for a variable definition file can be terraform.tfvars or any file name followed by .auto.tfvars. Both options will automatilcy be applied to the configuration. In the example below, we create a terraform.tfvars file in the same directory as the main.tf and varialbes.tf file. The variable value’s format is the variable’s name, the equal sign followed by the value.
location = "centralus"
The final terraform.tfvars file look like the image below:
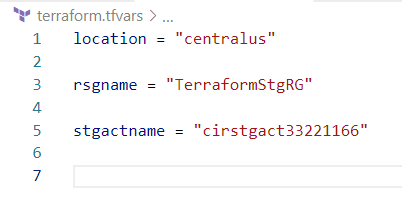
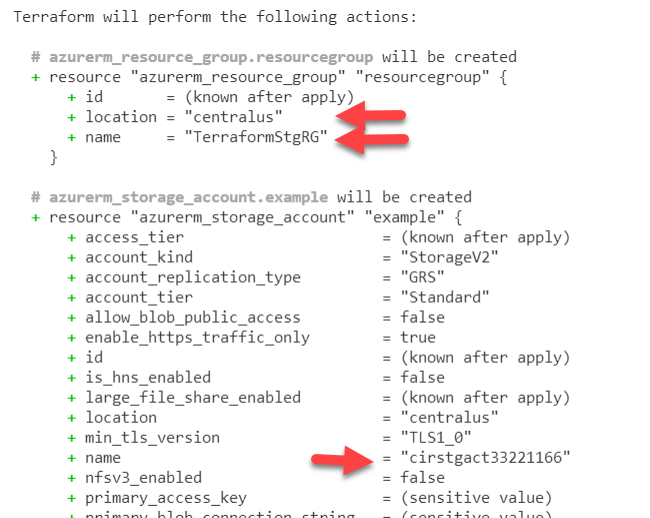
We can run a terraform plan with our updated terraform.tfvars file to verify the output matches values in the definition file.
Three Files
The number of configuration files has grown from one main.tf file to three different files. Organizing the configuration files provides scalability with more complex deployments and a uniform way to write code. The three files we have so far include:
main.tf – The main configuration file for resource deployment.
variables.tf – The file for variables used for the deployment.
terraform.tfvars – The variable definition file used to set the variables for the deployment.
With this file layout, we only need to modify the values of variables in the terraform.tfvars file to create a new deployment.
Locals
There is one more variable option that we should cover called Locals. Locals work much like variables. We create a code block with name, value pairs, and reference that name in the code. However, Locals have a different use case from variables. They are intended for repeating expressions in the code that may change. For example, if the code included a company name multiple times, a Local could be used instead of repeating the company name in the code. The local value would not be updated with new deployments. However, if that code was moved to another organization, the local could be updated with the new organization’s name.
Locals are helpful for changing expressions but could make the code hard to read if used too frequently. Use locals sparingly to avoid over-complicating the code.
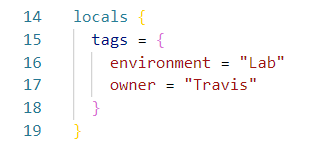
Locals are added by cratering a Locals block in the main.tf. The block starts with Locals followed by an opening and closing squiggly bracket. Name, value pairs can be grouped together in one block. For example, to create a Local called Name with our name as the value, enter:
locals {
  name = “Travis”
}
The example below creates a new Locals block for resource tags. Notice the local tags has a list of name, value pairs for the tags.
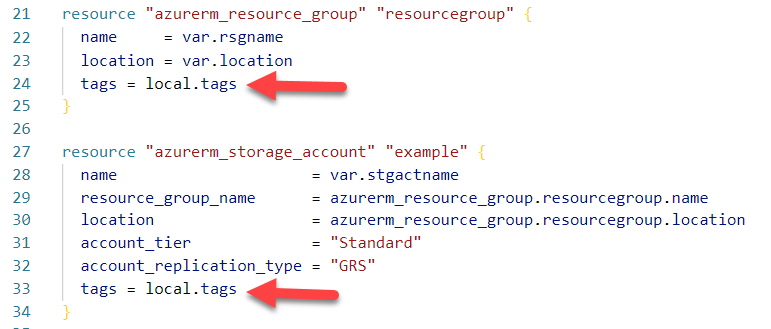
Reference the locals in the code by adding local.name. For example, below shows the local value for tags added to the resource group and storage account.
Verify Configuration
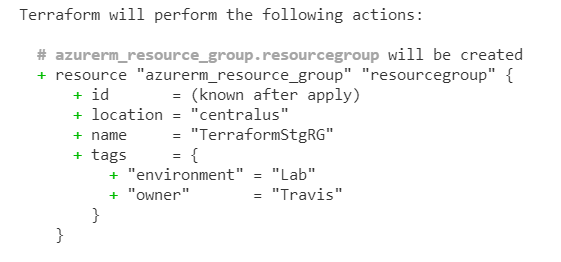
We have all of our files in place and updated our main.tf file with locals for the resource tags, now it’s time to deploy the configuration. Save all files, run the terraform init and terraform plan commands, and verify the variables and locals applied. Notice the terraform plan output below shows tag values.
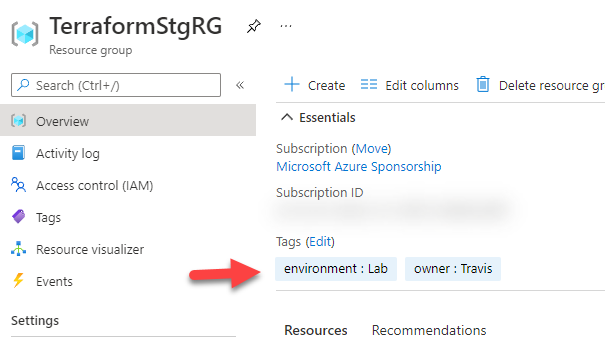
Run terraform apply to deploy the resources. Once finished, we can go to the portal to verify the resource group was created with tags.
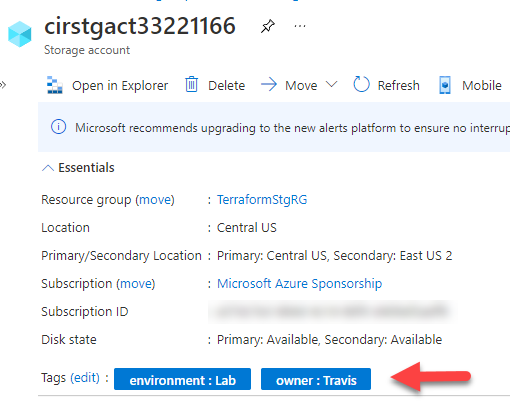
We can also verify the storage account name and tags.
Remove Resources
Run the terraform destroy command to remove the resources we just deployed if they are not needed.
Summary
That is how to create variables in Terraform, create a variable file, a terraform.tfvars file, and use locals in a configuration file. More Terraform goodness will be coming shortly; stay tuned!


